

KMS boss guide · About these guides
The First Adversary and Kaling ask for more than damage. The Korean First Adversary encounter centers on timed parries with the interact key. Kaling requires managing three beast-linked gauges while creating attack windows.
The source describes the Korean transition to shorter, 20-minute fights with adjusted HP. Check the selected difficulty's actual timer; this is not a timer claim for every GMS version. Learn the mechanics without losing the burst windows your clear needs.
Encounter basics in the Korean reference
| Category | First Adversary | Kaling |
|---|---|---|
| Entry level | 270 or higher | 275 or higher |
| Prerequisite region | Odium | Shangri-La |
| Phases | Three | Three |
| Core mechanic | Interact-key parries and the Power of Order gauge | Peril, Taowu, and Hundun-linked gauges |
| Early learning hurdle | Parry timing | Gauge balance and phase-three movement |
| Clear allowance | Once weekly under the applicable rules | Once weekly under the applicable rules |
For the First Adversary, learn the red-marked attacks and attacks matching your assigned element. For Kaling, read the three linked gauges as hits and phase transitions change the situation. This article calls the Korean First Adversary encounter by a descriptive English translation.
First Adversary: the parry key
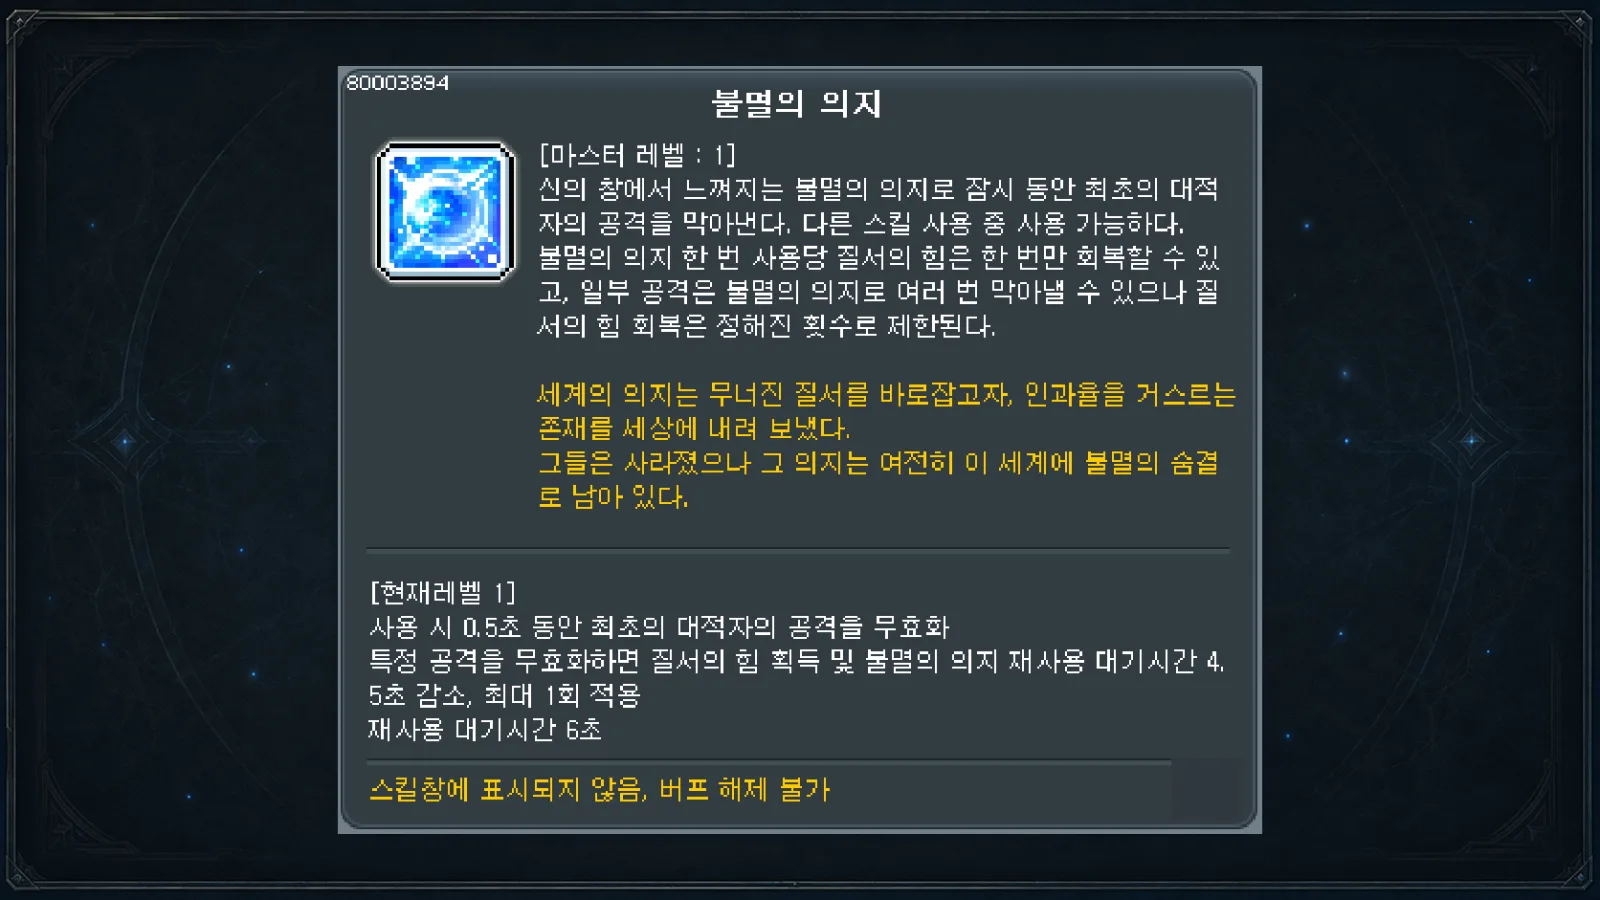
Pressing the interact/harvest key activates the encounter's brief defensive action, described in the Korean source as Immortal Will. Parrying an eligible red or matching-element attack restores gauge.
A successful parry refreshes access quickly enough for linked responses. Attempting every ordinary hit can instead leave the action unavailable for a more important attack.
Begin with four rules:
- Identify and practice the red-highlighted attacks.
- Dodge or crouch through ordinary attacks where appropriate.
- Do not force an unfamiliar parry timing.
- Preserve the gauge you have instead of gambling every sequence for a refill.
First Adversary phase 1
Sword shower
Swords drop first and then explode from the ground. Use an appropriate up-jump or aerial tool for the initial fall, then time the parry for the planted swords' explosion.
It can occur soon after entry. Learning this high-value recovery opportunity can make the opening burst setup more comfortable.
Find the real Adversary
Several figures prepare attacks together. The one with the glowing red dagger is the source's cue for the real attacker.
Track that figure and parry when its attack lands. If identifying it is still difficult, first practice the suggested edge-position crouch response where the pattern permits it.
Greatsword slash
Crouch the initial ordinary hit, then parry the red follow-up. The backswing and electrical effect help identify the relevant timing.
Dagger rush
The real attacker and afterimages overlap. Crouch the afterimage sequence, then parry as the actual dagger lights up.
Start by identifying the red effect and sound from a stable crouched position rather than trying to interpret every image immediately.
First Adversary phase 2
The character receives a fire, ice, or light element. Check the marker above your head before responding.
A matching-element parry can restore gauge; other elements need their appropriate avoidance route. Recheck after the power-cycle pattern because your assignment can change.
Elemental ground attacks
Move into a matching-element area and parry when its circles overlap.
You do not need to stand on the exact center. Be within the relevant attack area and meet its timing.
Rotating lasers
Three elemental lasers rotate around the boss. Parry your matching beam and use the portals to get past the other beams as the pattern allows.
Read the previewed rotation direction first so the portal route is ready before the beams arrive.
Side-to-side lasers
The safe opening between lasers shifts horizontally. Read its direction and use the portal route to reach it.
A matching beam can provide a recovery opportunity. Practice that timing separately from simply crossing the pattern.
Tracking arrows and sniping
Keep moving to draw out the tracking projectiles, then prepare to parry the final matching-element arrow. For sniping, controlled positioning close to the boss can help direct the arrows consistently.
Avoid the early arrows first. Taking them can disrupt the response to the final attack.
First Adversary phase 3
The third phase combines sword attacks and elemental responses. Parry matching attacks and avoid nonmatching ones.
For the three-hit greatsword sequence:
- Avoid the first ordinary attack.
- Parry the second elemental attack only if it matches your assignment.
- The third rainbow attack can be parried by any assignment.
The dagger sequence uses different elements on successive hits. Identify which hit matches your current element and prepare for that one.
When laser orbs overlap sword attacks, an appropriate invulnerability or Ascent skill can help if available. A healthy gauge is not a reason to force a dangerous parry.
Kaling: understand the three gauges
Peril, Taowu, and Hundun are the English beast names. In the Korean source, Hundun is the cloud beast, Peril the mobile flying beast, and Taowu the lightning beast. Repeated hits from one type can unbalance the linked seasonal gauges.
For early practice, prioritize:
- Avoid unnecessary ordinary hits.
- Stop taking attacks that worsen an already high gauge.
- Prepare a defensive response if deliberately taking a hit to adjust a gauge.
- Check all three gauges before a phase transition.
The source's example solo order is Hundun → Peril → Taowu. Class movement, burst timing, and the current gauge state can justify a different route.
Kaling phase 1: Hundun
Watch the claw attacks and dark-cloud trap. Facing direction and the turn before a swipe provide useful cues.
If trapped, attack to break out when appropriate. If the linked gauge is already in danger, do not blindly trade more hits just to keep damage going.
Luring Hundun toward one side can make breath and rush directions easier to read and leave more attack space.
Kaling phase 1: Peril
Peril's movement makes uptime harder. Chasing every flight can expose you to projectiles and map attacks on the way.
Use the landing or completed movement as a burst cue. Binding immediately before a move can waste part of the window.
Maintain useful uptime, but prioritize avoiding hits when the linked gauge is already high.
Kaling phase 1: Taowu
Lightning and electrified areas make this section demanding. Watch the rapid facing changes; standing behind or at a controlled distance can be easier than staying directly in front.
The source recommends reading successive lightning placements rather than assuming the previous spot stays dangerous forever. The middle can overlap hazards from both sides, so practice the edge routes first. Confirm the actual strike areas before moving.
Do not remain on an electrified area while trying to hold damage position. Read its location and reposition the beast as needed.
Kaling phase 2
Kaling and map hazards attack together. Binding the boss does not stop the independent flames, buttons, and forced-movement attacks.
Buttons
Approaching an armed button causes an explosion. A hit can leave a debuff that produces further explosions at the character's location.
Move away from party members while the follow-ups resolve, then return. The source suggests watching for roughly two follow-ups, but use the actual debuff and effects rather than that count as an immunity guarantee.
Grasping/forced-movement attack
The explosion can force a hit character elsewhere, potentially onto threads or another hazard. Stop attacking and avoid the tell instead of relying on the landing location being safe.
Controlled positioning can be better than constantly chasing Kaling across the map.
Burst timing
Bind after Kaling settles from a movement. A sufficiently strong burst can end the phase quickly; if not, stay controlled until the next opportunity instead of chasing into hazards.
Kaling phase 3
All three beasts and Kaling are present. Staying in one area can unbalance the gauges while the boss's attacks overlap, making movement between areas important.
Activate the statue linked to the beast you intend to attack. Watch Kaling's position too, because approaching the burst target can split damage onto the boss.
For initial practice:
- Learn Taowu's lightning and electrified-floor responses.
- Move between Hundun and Peril areas while watching gauge changes.
- Avoid Kaling's forced movement and button debuff.
- Coordinate the final beast's HP with Kaling's HP.
- Use the remaining burst when gauges and positioning are stable.
Removing a beast too early can leave awkward empty-area movement for gauge management. Plan the remaining targets' HP so they can be finished in a controlled sequence rather than treating the first available kill as always best.
What is an intentional gauge-overflow strategy?
The Korean community calls the approach turbuil: intentionally trigger the overflow of two seasonal gauges, then manage the remaining gauge. It can create uptime in a tightly planned low-headroom clear, but changes the encounter's risks.
One version focuses the planned overflow around Taowu's linked gauges, then plays between Hundun and Peril. The source places its setup in phase two or early phase three.
This is more than filling a gauge. It requires a planned beast order, burst count, and final target.
For a first clear, learn ordinary gauge management before practicing a specialized overflow route.
Practice goals for the two encounters
For the First Adversary, repeat phase-one sword-shower and dagger-rush practice. Consistent timing makes later gauge management easier.
For Kaling, start with Hundun's claw and Taowu's lightning. Reliable lightning responses carry over into the crowded third phase.
Use measurable goals in practice mode:
- Parry three familiar First Adversary phase-one attacks consecutively.
- Recheck the assigned element during phase two.
- Finish Kaling phase one without a gauge overflow.
- Survive phase two without the button debuff.
- Maintain a planned attack sequence in Taowu's phase-three area.
Frequently asked questions
Must I parry every red attack?
No. If the timing is unfamiliar or the gauge is sufficient, use an appropriate avoidance response. Start with the recognizable, useful recovery patterns.
Which key parries the First Adversary?
The encounter uses the interact/harvest key in the Korean reference. Check the binding before entry and put it somewhere comfortable.
Which Kaling phase-one order should I use?
Hundun → Peril → Taowu is the source's beginner solo example. Adjust for class tools, burst timing, and gauges; it is not mandatory for every party.
Do I have to use intentional overflow?
No. It can be part of a tight clear's uptime plan, but a first clear with adequate damage can use normal gauge management.
What should I practice first in Kaling?
Hundun claws and Taowu lightning in phase one, buttons and forced movement in phase two, then survival in Taowu's area in phase three.
Practice one interaction at a time
For the First Adversary, use both animation and sound to learn the parry. Start with a few attacks you can identify reliably instead of attempting everything.
For Kaling, keep checking the three gauges. Preventing an uncontrolled overflow and reaching the next safe burst can be worth more than a few extra attacks.
Phase-specific practice goals make progress easier to judge. Start with parries for the First Adversary, and gauges plus Taowu survival for Kaling.