

KMS build · About these guides
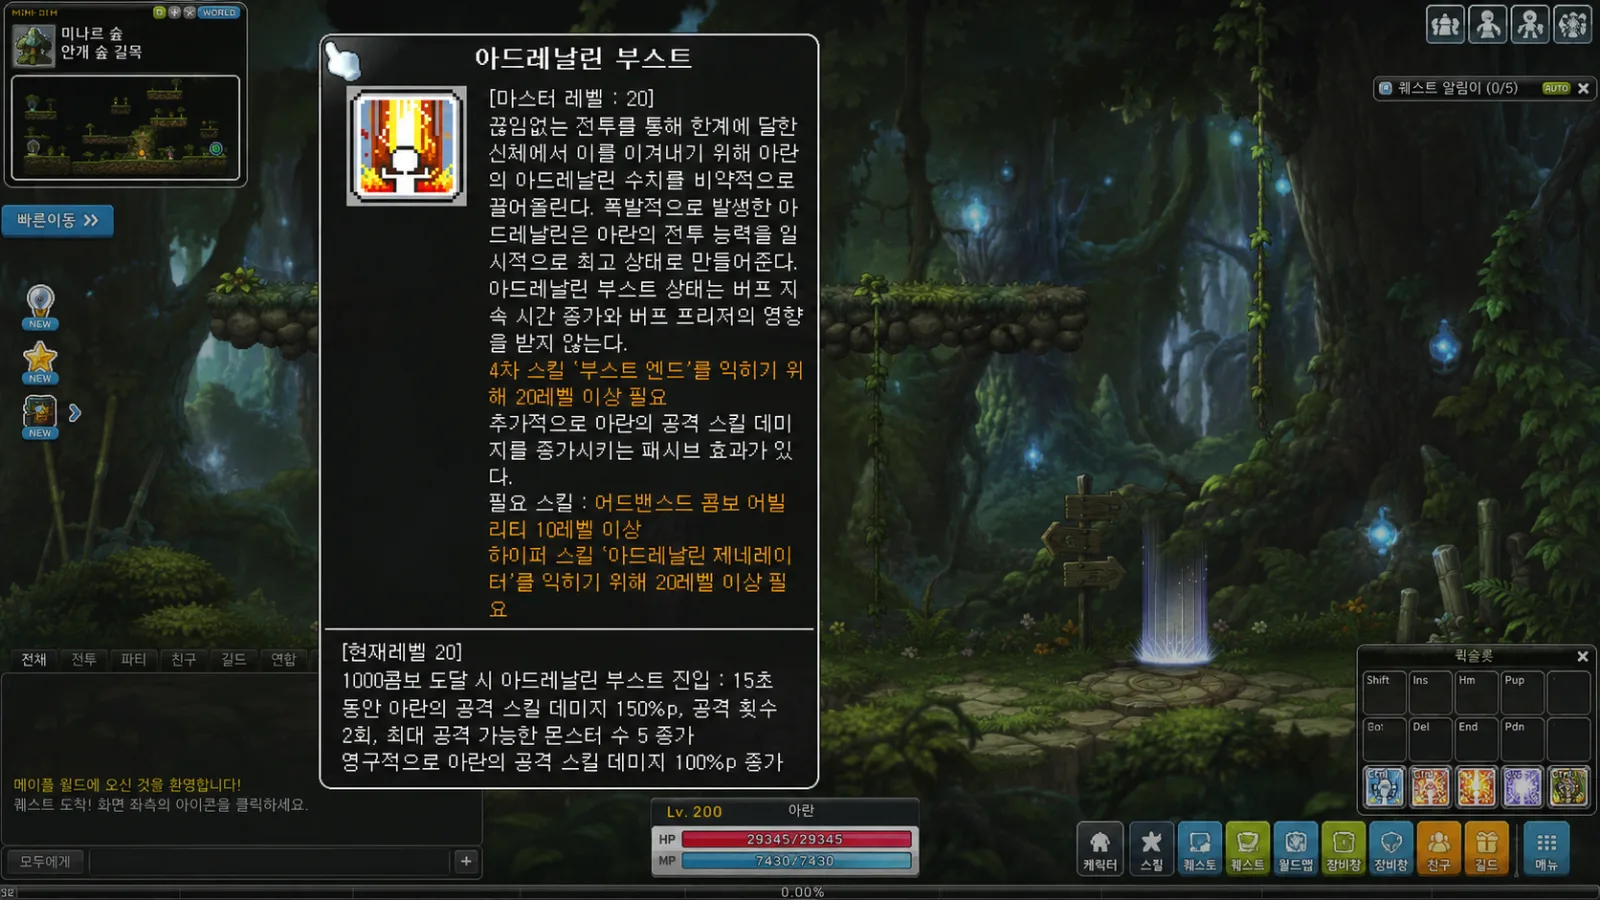
Aran is a Hero warrior using a polearm. Build Combo, enter Adrenaline Rush, then concentrate key attacks into the stronger Adrenaline Overload window.
The burst is concentrated, with useful movement and defensive tools. A new player still needs time to learn Combo, Final Toss movement, and the steps that lead into Overload.
This follows the Korean summer-2026 build reference for Inner Ability, Hyper Skills, nodes, execution, and HEXA. English names below use Adrenaline Rush and Overload for the source's Boost and Maximum terms; later balance changes can alter priorities.
Strengths and tradeoffs
Aran's strengths
Concentrated burst and mobility are central to the class.
Adrenaline Rush and Overload let you align major attacks with the party's planned damage window.
Final Charge repositions and cancels attacks; Final Toss and Combat Step offer flexible aerial movement. Drain and defensive skills support survival as you learn when to use them.
- Strong concentrated burst windows
- A sustained loop centered on Beyond Blade
- Quick movement through Final Charge and Combat Step
- Recovery and invulnerability tools
- Wide attacks useful in training and bosses
What takes practice
Final Toss handles upward movement differently from a conventional up-jump. Practice its trajectory first.
Burst is more than turning every buff on: you need Combo, enter Rush, satisfy the hit condition, and reach Overload. Missing the setup can delay the intended window.
Use Beyond Blade and Maha's Carnage consistently to help maintain Combo under the reference's conditions, then check the actual gauge before committing to burst.
Inner Ability
The source's finished bossing target is:
- 20% Boss Damage
- 8% damage to enemies affected by abnormal status
- 21 Attack Power
If completing every line is too expensive, a useful first-line Boss Damage roll is a reasonable starting point.
A dedicated farmer can compare Item Drop Rate, Meso Obtained, and normal-monster damage. A main continuing into bosses may prefer keeping a usable bossing setup or using the available presets.
Hyper passives
The source prioritizes these five effects:
- Finisher - Reinforce
- Finisher - Guardbreak
- Surging Adrenaline, the extended-Adrenaline effect
- Beyond-er Blade, the Beyond Blade damage enhancement
- Beyond Blade Barrage, the extra-attack enhancement
Beyond Blade is used repeatedly in sustained damage and bosses. The Finisher passives support attacks such as Finisher - Hunter's Prey.
The extended-Adrenaline passive adds room to the enhanced-state window. Check the exact live effect rather than choosing solely from an older Korean passive name.
Boost-node targets
The source's six-group plan uses:
Main boost groups
- Beyond Blade
- Finisher - Hunter's Prey
- Hyper Finisher - Last Stand
- Final Attack
- Smash Swing
- Adrenaline Rush-related boost group
Begin with Beyond Blade, Hunter's Prey, and Last Stand if they make up the useful damage in your current fights.
The source's three-copy, six-node example
The first trio is:
- Beyond Blade
- Finisher - Hunter's Prey
- Hyper Finisher - Last Stand
The second trio is:
- Smash Swing
- Final Attack
- The Adrenaline Rush boost entry
Use nodes with different leading skills so the intended skills can overlap. The three-copy layout is one reference configuration; respect the boost-level cap and slot bonuses, and compare a later two-copy layout before locking in every node.
A limited-purpose boss alt can develop the first trio before spending on the rest. A long-term main has more reason to complete the broader setup.
Fifth-job reference order
For an early training-focused route, the source suggests:
- Decent Holy Symbol
- Final Beyond Blade - White Tiger
- Blizzard Tempest
- Finisher - Adrenaline Surge
- Maha's Carnage
- Weapon Aura
- Maple World Goddess's Blessing
- Freud's Wisdom
Holy Symbol helps training EXP and drops, so it can be useful early while leveling.
If boss damage is the immediate goal, compare the main class attacks first, then fill shared nodes. The list is not a universal damage-per-Fragment ranking.
Settings to check
Required toggles
After reconnecting or reviving, check Drain, Snow Charge, and any other effects the current setup needs.
Also check the applicable Sol Hecate resonance/setup. A missing toggle can change both damage and survival compared with the intended build.
The Adrenaline custom command
Right-click Adrenaline Rush Activate to review or enable the available custom-command behavior.
The source uses it to move into Overload efficiently during a full burst while retaining control of smaller windows. Practice how your current client advances the state before using it in a difficult boss.
Lock unwanted directional commands
Not every attack needs to be entered through a directional combination.
For precisely timed skills such as Final Charge, Judgment Draw, Permafrost, and Adrenaline Surge, a direct hotkey and a locked directional command may be more comfortable.
If Adrenaline Surge's command interferes with your upward movement inputs, disable that command and use the direct key.
Movement tools

Final Charge
Use it as both a rush and a way to cancel Beyond Blade when a mechanic requires movement.
Practice leaving an attack on cue. Alternating with Combat Step can help when several movements are needed, subject to the current skill restrictions.
Final Toss
Final Toss is Aran's upward-movement tool in this reference.
It can be used from the ground and again in the air, with Combat Step inserted at different points.
- Final Toss → Final Toss → Combat Step
- Final Toss → Combat Step → Final Toss
- Jump → Combat Step → Final Toss
The inputs can initially feel unfamiliar, but practice gives more control over height and horizontal distance.
Smash Swing
It can help adjust position as well as attack.
An aerial use can alter the fall and movement flow. Practice that interaction away from lethal mechanics before relying on it for extra hang time.
Sustained damage
Beyond Blade is the core repeated attack.
Use Maha's Carnage and Permafrost at useful times, then cancel or reposition with Final Charge when the boss requires it.
A basic loop is:
Beyond Blade repeats → Maha's Carnage → place Permafrost → return to Beyond Blade
Maha's Carnage helps cover a wide area and build Combo. Put Permafrost where the boss will remain rather than treating a ready cooldown as a reason to place it out of reach.
The two Adrenaline stages
Understand the state transition before memorizing the burst inputs.
Stage 1: Adrenaline Rush
With sufficient Combo, use Adrenaline Rush Activate to enter the enhanced state.
Hunter's Prey and Adrenaline Surge use that state as part of their conditions.
Stage 2: Adrenaline Overload
Meet the required hit condition during Rush to enter Overload.
Overload grants the stronger finisher window, including the enhanced Surge and Last Stand interactions in the source's setup.
Do not infer two usable finishers from the displayed cooldown alone. Track the state and per-activation conditions shown by the current skill; the source's beginner sequence uses the eligible finisher once per relevant entry.
A beginner burst sequence

Rings and sixth-job progress change the details. Practice the source's basic flow first:
- Prepare Freud's Wisdom in advance.
- Activate the planned burst buffs or compatible Skill Sequence.
- Use Blizzard Tempest when its bind and damage setup fit the boss window.
- Use Maha's Carnage.
- Enter Adrenaline Rush.
- Use Hunter's Prey to help satisfy the hit condition.
- Enter Adrenaline Overload.
- Use Adrenaline Surge under its current conditions.
- Use Last Stand.
- Continue with Beyond Blade.
The reference emphasizes using Maha's Carnage before returning to Beyond Blade rather than losing its contribution in the setup.
Separate buff keys from attack inputs. Freud's Wisdom has stack timing to manage, so do not assume every buff belongs in one undifferentiated sequence.
Binds and defensive tools
Blizzard Tempest supports both the bind and the burst setup.
Hunter's Prey has invulnerability associated with its use. If the mechanic does not require holding it longer, a shorter channel can let you continue the planned sequence sooner; verify the live timing before depending on it.
Maha's Blessing also belongs in the defensive plan. Do not consume every protection tool at once if another lethal mechanic is approaching.
Sixth-job HEXA direction
After level 260 and sixth-job advancement, develop the relevant HEXA skills.
The source's main entries include:
- HEXA Beyond Blade
- HEXA Finisher - Hunter's Prey
- HEXA Hyper Finisher - Last Stand
- HEXA Final Attack
- HEXA Adrenaline Overload
- HEXA Permafrost
Beyond Blade contributes in training, sustained damage, and burst, making its initial unlock useful. Last Stand's burst share can make it attractive at some upgrade levels.
The next best level depends on current nodes, available Sol Erda and Fragments, and actual attack contribution.
Unlock the useful low-level effects, then compare their next steps. Do not automatically max one skill before checking the rest.
Hyper Stats, Links, and Legion
Compare these stats:
- Critical Rate
- Critical Damage
- Damage
- Boss Damage
- Ignore Enemy Defense
- Attack Power and main stat
Fill a genuine Critical Rate gap before assuming 100% is covered. Then balance Boss Damage, Critical Damage, and IED around the target fight and the rest of the setup.
Useful bossing Link candidates include Demon Slayer, Demon Avenger, Luminous, and Angelic Buster. Choose the effects that fill your current needs.
Use Legion to support Critical Damage, IED, and Boss Damage, then fill any missing Critical Rate rather than copying a board without checking the stat window.
Training

Before level 260, clear the main route with Beyond Blade and use Maha's Carnage and Permafrost for wider coverage.
A simple route can:
- Clear the main platforms with Beyond Blade.
- Use Maha's Carnage for the wider section.
- Place Permafrost in the appropriate area.
- Move between platforms with Judgment Draw and movement skills.
- Repeat as the coverage skills return.
After sixth job, extra area attacks can reduce movement on suitable maps. That is map- and setup-dependent rather than a promise of stationary farming everywhere.
Check platform coverage, hits to kill, and actual EXP over a session, not only the map's theoretical monster EXP.
Starter equipment
Develop it in stages rather than trying to finish every slot immediately.
1. Training foundation
Use eligible event gear and boss accessories to reach comfortable kills. Useful Epic main-stat potentials and appropriate Star Force can be early goals.
2. Weekly bosses
Check Attack Power, Boss Damage, and IED on the weapon, secondary, and emblem, then compare armor and accessory upgrades.
3. A long-term main
Choose the boss target and budget before replacing items. Compare the weapon-related slots and rings with the class's burst structure in mind.
A learning order for Aran
You do not need every command and full burst input memorized immediately.
Start with Beyond Blade and Final Charge cancellation, then learn how Rush becomes Overload.
Keep these priorities visible:
- Useful bossing Inner Ability lines: Boss Damage, abnormal-status damage, and Attack Power
- Early boost focus: Beyond Blade, Hunter's Prey, Last Stand
- Understand the Adrenaline custom command
- Place Final Toss and Final Charge on comfortable keys
- Practice the Rush → Overload transition
- Use Maha's Carnage before returning to Beyond Blade
- Adjust HEXA to the current setup and damage contribution
Aran's controls are distinctive, but learning movement and the enhanced-state sequence provides a practical foundation for both training and bosses.
Frequently asked questions
Is Aran difficult for a beginner?
The repeated attack loop is approachable. The upward movement and Adrenaline transition need practice before the full burst feels comfortable.
Which boosts come first?
The source starts with Beyond Blade, Hunter's Prey, and Last Stand, then develops Final Attack, Smash Swing, and the Adrenaline group as needed.
Which first Inner Ability line?
Boss Damage is the source's bossing target. A dedicated training character can compare drop or meso lines instead.
What matters most in burst?
Have the required Combo ready, enter Rush, meet the hit condition, and reach Overload in the intended attack window.
Which HEXA skill should I unlock first?
Beyond Blade is a useful early candidate because it is used across several activities. Compare later levels with the current build rather than treating one order as permanent.