

For the Season 16 PTR Dread Claws Warlock, the first check is whether Evade and Shadowform stacks keep feeding each other without stalling, rather than your damage sheet. Movement, offense, and defensive effects share one loop. Understanding how each effect enables the next action is more useful than collecting the same item names and expecting the build to work.
“Infinite teleport” doesn't mean unrestricted movement. It's shorthand for a setup linking Footfalls of the Waning World, Shadowform generation and consumption, and cooldown reduction. The Season 16 PTR was a pre-release test and has now ended. This guide explains that test setup; recheck item effects and values when the season goes live.
How Dread Claws deals damage, and why movement matters
Dread Claws is a Warlock attack. The reference setup uses the version that manifests claws around your most recently summoned Greater Demon, with a Rampage demon anchoring the fight. Positioning your attacks and maintaining the demon are connected parts of the build.
Shadowform does more than provide stealth. It supports offensive set conditions, and consuming its stacks also connects to the boots' Evade cooldown reduction. Running out can disrupt both damage bonuses and movement rhythm. Reliable stack recovery matters before simply adding more claw damage.
That's also why mobility matters in harder content. Reaching the next pack quickly isn't enough: you need to escape dangerous ground effects, rebuild attack conditions, and limit gaps in defense. This setup aims to tie those actions together. It doesn't make every teleport an invulnerability window.
How Footfalls of the Waning World keeps Evade cycling

Footfalls of the Waning World is the core boot slot connecting Evade with Nether Step. The reference build uses cooldown reduction when Shadowform stacks are lost or consumed. Dread Claws spends stacks, while sources such as Sigil of Subversion's shadow trails replenish them, opening the next Evade.
Gear cooldown reduction, attacks reducing Evade's cooldown, and Mobility Skill cooldown reduction all contribute. The boots alone won't reproduce the same pace. Stack generation, stack spending, and Evade recovery need to line up.
Wrath is a separate check. Having enough Shadowform stacks doesn't mean you have enough resources to keep attacking. If you can move but Dread Claws stops, inspect Wrath generation and resource cost reduction first. The reference setup supports that with Wrath per second on armor, the Unbound glyph, and resource effects from the Dominion Legendary node.
If Wrath is fine but Evade feels slow, inspect stack generation, the boots, and cooldown-related affixes instead. Swapping damage affixes without identifying the cause makes improvement hard to explain. Test sparse packs and bosses as well as dense pulls before judging the loop's reliability.
Build the role of each gear slot before chasing the names

The main pieces are summarized below. Separate the slots that enable movement from those that scale damage so you can set a realistic farming order.
| Item or component | Role in the reference setup |
|---|---|
| Footfalls of the Waning World | Core of the Evade movement and cooldown loop |
| Rictus of Terror | Connects Command Laalish with Unfathomable Fragment |
| Litany of Sable dagger | Links Shadowform generation to Dread Claws casts |
| Fists of Fate and Bindings of Attrition | Pieces in the reference build; evaluate alongside the full affix setup |
| Chest and jewelry affixes | Wrath generation, cooldown reduction, and survival |
| Legendary Aspects such as Inner Calm | Need to match the conditions you actually maintain in play |
Be careful with the dagger's naming if you're following Korean resources. The official Korean PTR notes and linked planner use different Korean names for Litany of Sable. Match the English item name and its Shadowform effect so you don't mistake the two labels for different items.
The official PTR update changed the dagger to cast a full Dread Claws when an effect grants more than one stack at once. That makes it more than a simple damage multiplier: generating stacks can itself trigger attacks, so changes to generation alter the actual casting flow.
The reference build uses the Mastermind Shard and Blasphemous Fragment. Check those choices before mixing in parts from another Warlock build. Two setups may both summon demons while relying on different skills, resource conditions, and cooldown mechanics.
The published planner is an endgame setup. Owning the named Uniques won't reproduce a version with its completed upgrades, tempers, and affixes. While assembling it, first establish uninterrupted resource sustain, then stabilize Evade, then expand offensive investment.
Why combine Shadow of Harash and Rite of the Nameless?
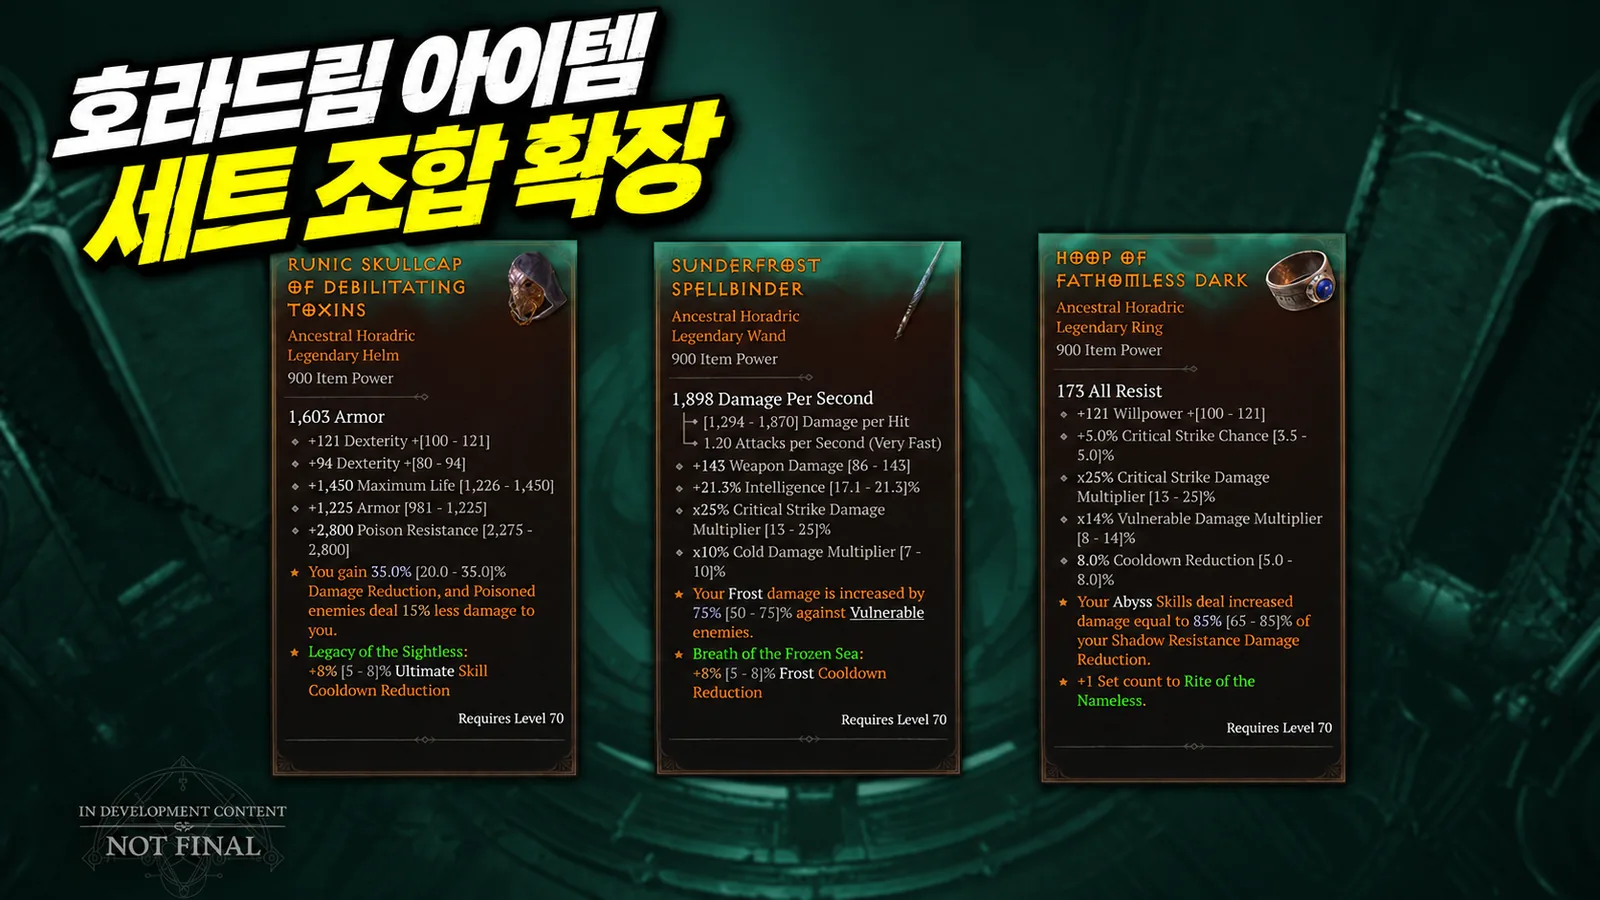
The reference setup activates the five-piece bonuses of both Shadow of Harash and Rite of the Nameless. The first centers on Shadowform, Abyss Skills, and interactions with Dominated enemies; the second supports offense and defense through Sigils and ritual progression. The aim is to layer their different conditions in one fight.
Knowing the set names doesn't explain how both fit. Season 16 PTR Horadric jewelry affixes add one to the effective Charm count of a specified Talisman set. That reduces the physical Charm slots needed and makes mixed sets possible.
For example, one Charm plus one compatible Horadric jewelry piece can reach a two-piece bonus. The key is which set the Horadric affix supports; arbitrary jewelry doesn't add a count. Horadric armor and weapons work differently, granting extra effects while the matching set already has at least its two-piece bonus active.
This directly affects farming difficulty. Jewelry with excellent cooldown reduction may still fail the set requirement, while a piece that completes the set may leave resources or survival too low. Check both five-piece activations alongside the stats that keep the build playable. A strong final layout isn't necessarily easy to copy at the start.
Distinguish holding position from ordinary movement
Start by using Sigil of Subversion as a stack-generation base, maintain the demon through Rampage, and cast Dread Claws. Command Laalish, Dark Prison, and defensive use of Metamorphosis also contribute. Two buttons—claws and Evade—don't automatically satisfy every condition.
The reference setup includes position-related effects such as Inner Calm. Ordinary walking and moving with Evade while using the hold-position input aren't the same control pattern. The keyboard-and-mouse approach combines hold position with Evade. If that feels awkward, check the game's hold-versus-toggle options and choose a comfortable input setup.
Don't stand in danger just to preserve a damage bonus. Avoiding a major boss hit or overlapping ground effects comes first. Repositioning and rebuilding conditions is better than dying to maintain them. Mobility protects your attack setup, but it also lets you correct a bad position.
Check boss sustain before chasing a higher Pit number

The reference setup reports a Pit 130 clear. One PTR result isn't a performance guarantee for every gear level or a final live-season tier ranking. Predictions of higher clears should also stay separate from completed runs.
Three boss checks are more useful: can you sustain Wrath against one enemy, can you survive when a defensive effect expires, and can you recover lost Life? Long single-target fights expose gaps that fast pack clears can hide.
The source creator didn't establish the cause of the Life loss observed around Dark Prison usage. This guide therefore doesn't label it a confirmed bug or a confirmed cost from one item. If it happens to you, separate skill upgrades, equipped effects, and incoming hits in your review. Adding damage or Wrath regeneration won't necessarily solve an unidentified Life issue.
Choose the build by whether your own gear sustains movement, stacks, and resources together, rather than the highest clear you saw. If you enjoy tuning that loop, it's worth investigating. If the boots or resource base are missing, fix the interruptions before rushing both five-piece bonuses. That will do more for practical farming comfort.
